Amazing Handmade Pastry (Maznik)
Traditionally maznik is made every “Suroâ€, for the “Old New Year” celebrated on 14 January (following the Julian calendar). A gold coin (wrapped in foil) is placed into the dough and baked. Each family member is then cut a slice of maznik, the tray is spun three times and the person that finds the coin has a full year of ‘good luck’. It’s a lot of fun and definitely something we all look forward to.My great grandmother, Baba Pera taught mum how to make maznik at the young age of 12. There was no written recipe and no measuring cups, the recipe had been memorized and practiced for generations and passed down to all the females in the family.
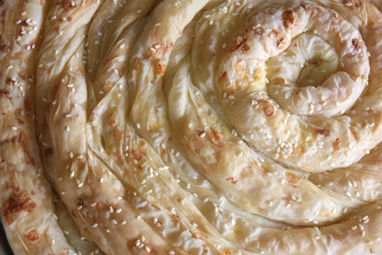
It’s likely that maznik dates back to the Turkish Ottomon rule of the Balkans as each country has their own version. In Macedonia, maznik is a national dish, and dear to the hearts (and stomachs) of many. Making it on the other hand is back-breaking stuff and anyone who has attempted it, or has watched it being made knows it’s a labour of love and requires quite a lot of practice. Although it’s hard work, my goodness is it worth it! Handmade filo-like pastry rolled and filled with feta and baked until golden and flaky.
Maznik can be made by rolling (suchenje) or pulling (tegnenje) the dough. Rolling is definitely the more difficult of the two techniques but in my opinion is the tastiest and most delicate.
Maznik tastes best while still warm and enjoyed with fresh tomato salad and yoghurt.
P.S. I promise to follow this recipe up with a quick ‘Cheats Maznik’ recipe with store bought filo pastry.
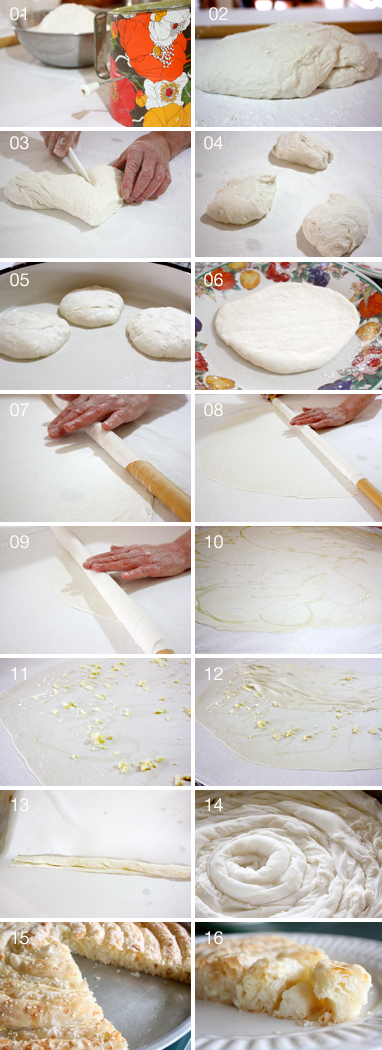
Maznik process ……………………………………………………………………………………
Recipe
Makes 2 large mazniks (or 3 small)
Ingredients
Sponge (yeast mix)
1/2 cup (125ml) lukewarm water
1 (7g) packet dry yeast
2 teaspoons sugar
2 teaspoons flour
Dough
1kg 00 plain bread flour, sifted, plus an additional 500g for dusting
1 teaspoon sea salt
3 tablespoons (60ml) cold water
2 tablespoons (40ml) warm water
2 2/5 cups (600ml) lukewarm water, depending on the weather you may not need to use all of the water
2 1/2 tablespoons (50ml) vegetable oil
2 cups (500ml) vegetable oil (canola or rice bran oil)
500g feta cheese, grated
Sesame seeds for sprinkling (optional)
You will need:
– Large bowl (for dough)
– Damp tea towel (to cover the resting dough)
– Clean tablecloth or bench
– Long thin rolling pin (make your own by purchasing a 1.2m length of unfinished dowel from your hardware store and sand until very smooth)
– 2-3 large round trays (16″ pizza trays work well)
– Rectangular baking tray (for resting dough balls)
– 2 dinner plates, dusted with flour (to rest flattened dough)
– 2 medium bowls (1 for dusting flour, the other for grated feta cheese)
– Mug and tablespoon (for drizzling oil)
Method
1) To make sponge, stir water, yeast, sugar and flour in small bowl until smooth (1 minute). Allow to rest (7-10 minutes) or until double in size.
2) Grease round trays with vegetable oil.
3) Sift flour and salt into a large bowl and make a well in the centre. Add 3 tablespoons cold water, 2 tablespoons warm water and sponge (yeast mix). Use one hand to combine/mix while the other turns the bowl and combine the mixture (2 minutes). Add 1/3 of the water and mix again (3 minutes), add another third and combine (3 minutes), with the remaining water slowly add small amounts until the dough begins to clump and move as one (5 minutes).
4) Dust tablecloth or bench generously with flour. Place 1/3 of the dough (1/2 if you only have 2 large round trays) onto the surface, clean your hands properly to remove all the wet dough (rubbing with flour works best). Cover the remaining dough in the bowl with a damp tea towel to stop it from drying out. Return to the work surface and dust the top of the dough with flour and gently roll to cover all over, cut into 8 pieces (size of tennis balls) and knead into even balls (knead 20 seconds per ball), place onto an oiled tray, drizzle top with oil. Take the first ball (which will have flattened slightly), dust and knead again into an even ball, flatten using the palm of your hand, flipping 2-3 times and roll out to 20cm in diameter, rest on a flour dusted plate. Repeat with another ball, flattening and similarly rest on another floured plate.
5) Using the flattened dough from the first plate, dust both sides generously, dust the rolling pin and begin to roll out to an even circle (30-40cm in diameter). Dust with flour again, wrap one end of the sheet over the rod and quickly roll while gently pulling the dough, unroll in the opposite direction, i.e. if rolling from the left, when unrolled the rod will end up on the right. Use your rod to gently roll and even out the circle. Dust again and repeat this process another 2-3 times, rolling from left and pulling out to the right. By now the dough sheet should be thinner and larger so it will tear more easily. Dust with flour (concentrating on the edges as they will be stickier), once again wrap one end of the sheet over the rod and quickly roll while gently pulling the dough, unroll in the opposite direction. This time don’t use your rod to roll and re-shape. Repeat this process another 15 times and only dust with flour every 2-3 times or as required (e.g. if the dough sticks) until rolled out to a large even circle (approx. 1m in diameter).
6) Drizzle over oil by dipping your spoon vertically into the oil and quickly removing, then drizzling in a circle motion. Evenly sprinkle with 2 heaped handfuls of feta cheese. Using your fingers gently pick up the edge closest to you and fold over until half way, pick up the opposite side and fold over until just overlapped, drizzle with oil again and gently roll into a long sausage (if rolling on a tablecloth this can also be done by lifting the edge of the tablecloth closest to you and allowing the pastry to naturally fall/roll). Starting in the centre, arrange in an even coil on your oiled round baking tray (in a snail shape).
7) Return to your work area, take one of the balls (which will have flattened slightly), dust and knead again into an even ball, flatten using the palm of your hand, flipping 2-3 times and roll out to 20cm in diameter, rest on your empty flour dusted plate. Take the other rolled dough from your other plate and repeat steps 5 and 6 and continue to do this until the tray has been filled (you will need approx. 6-8 coils).
8) Once you have a full tray of coils, drizzle generously with oil, particularly around the edges and sprinkle with sesame seeds (optional). Allow to rest uncovered for 30 minutes. Preheat oven to 200°C.
9) While the maznik is resting prepare your 2nd tray and repeat steps 4 to 8.
10) Bake for 25-30 minutes or until lightly golden. Rest for 10 minutes and serve while warm or at room temperature.
Tips:
– Maznik will keep refrigerated for up to 5 days or frozen for up to 3 months. Reheat in a hot oven before serving, it tastes almost as good as fresh maznik.
– Check out this video of an expert maznik maker, the technique is slightly different but it will help to give you an idea of how thin each sheet needs to be


 are preserved and enjoyed
Daniela
Sreknja nova godina! Thanks for putting this recipe up. I think its about time I stopped making the cheats version with filo pastry and give the authentic recipe a go. Good luck with the coin hunt this year.
Antonij
… and I will eat this authentic Maznik which you plan on making.
Great work putting it up on the web!
Raheleh
Hi,
I just read this recipe, looks a bit complicated, but as it is an old tradition it worth to be cooked. Some of your recipes looks the somehow the same in my country(Iran). Thanks for puting them on web,
VillageCook
Hi Raheleh, I agree a lot of the food I cook is very rustic and hence can be complicated as the ingredients are raw/natural rather than mass-produced, but that’s what I love about all the old recipes. Would love for you to send me a traditional recipe from your country/family that I can post in the future. Suzanna
Zore
omg.. amazing.. can you teach me.x
VillageCook
Maznik lessons…now we’re talking!
Mary
You are a legend Little Sus! I’ve always wanted a written receipe for this … I’ve printed it off and will let you know how I go!
Samantha
I have never heard of Maznik. Sounds delicious though!
Mira
I am so proud that finally we have Baba and Mum’s amazing Maznik on record, it would have been a shame to loose such a valuable part of our culture, I am extremely proud of you little sis’.
Suzanna
Thank you! Sxx
Mira
Yep not an easy task but even at the ripe old age of 12 Like Mum I too was given the honour to be taught how to make “Maznik” by Baba Tala moments like these I treasure!! L your sis’
Kelly
Hi there! So great to see this recipe online my baba taught me to let the maznik roll itself naturally by lifting the tablecloth as well! It really does make life easier! Good on you for putting this up!
VillageCook
Thanks Kelly, it’s nice to know that your baba has the same technique, proves that the old cooks really are the best!
Amanda
I learned with my Baba as well – very similar – except ours is risen twice (after rolling and placing in circular dish we leave it again to rise before putting in the oven) and at the point that the dough is separated into balls we squish the balls down a bit, then butter the tops of them (always loved as a kid sticking our fingers in the butter and smearing it all over!) and then layer them in pairs for rolling. This gives it a croissant-like flakiness in the final version that is just amazing. My Baba is famous for her feta maznik, shallots maznik, spinach and feta maznik, pumpkin maznik and leek maznik (plus, of course, the apple and walnut). Yummy. My only problem has been finding the large circular dishes with deep sides. Does anyone know where to get them?
Village Feast
Hi Amanda, I’d try a commercial kitchen or cake decorating shop – they may have large baking tins.
Melinda
I love your illistrated receipe. Thank you so much. I’m going to give this ago.
Could you post, “how to make zelnik”?
Michael Sterioff
Thank you for inspiring me to do what I saw as a kid when my Baba, Aunties and mom made home made fillo with the stretch and pull technic. As a young man my family’s food was always the best. I’ve made fillo with the same technics but not like the link you suggested to follow. I now have a bakery and will try throwing the dough as shown on YouTube. Thank you very much you touched my heart.
Stacey
This is the first time I have heard of manzik. I do make my own filo dough.
We make the pita dough which is a rustic country dough from Kastoria, Macedonia, Greece. I have never made the sponge, & I look forward to it. The coin tradition is the same.